Hiya, I finally got around to fixing my original Xbox by replacing a few capacitors! This was the first time I have ever tried soldering, and I wanna go over what I did and share some photos throughout this post :)
The X'd Box: This is my original xbox, both in the sense that it is an original 'Xbox' console that belongs to me, and my original one from 2004. It is a version 1.4 model, which are prone to the clock capacitor leaking but can function without it. Previous maintenance I have done includes;
- Removed the clock capacitor by rocking it back and forth until the legs snapped off.
- 'Refreshed' the disc drive belt; sticking it in boiling water briefly so that the rubber shrinks a bit. The drive now opens/closes normally.
After that, it was working fine for a while until...
The Visual Glitching: After starting to use it a bit more a year ago it began having visual issues. Every 10-15 minutes it would do this weird flickering thing that I can best describe as like if some of the colours or frames were on a different layer and being pulled off the side of screen (see this random yt vid or reddit post for visual). This was annoying but you could still play a game through it, until eventually the longer the console was on, the more frequently these glitches would happen and they would start causing screen blackouts of 5-15 seconds length. During all of this the game would still be running, and you would be back where you were when the screen recovered.
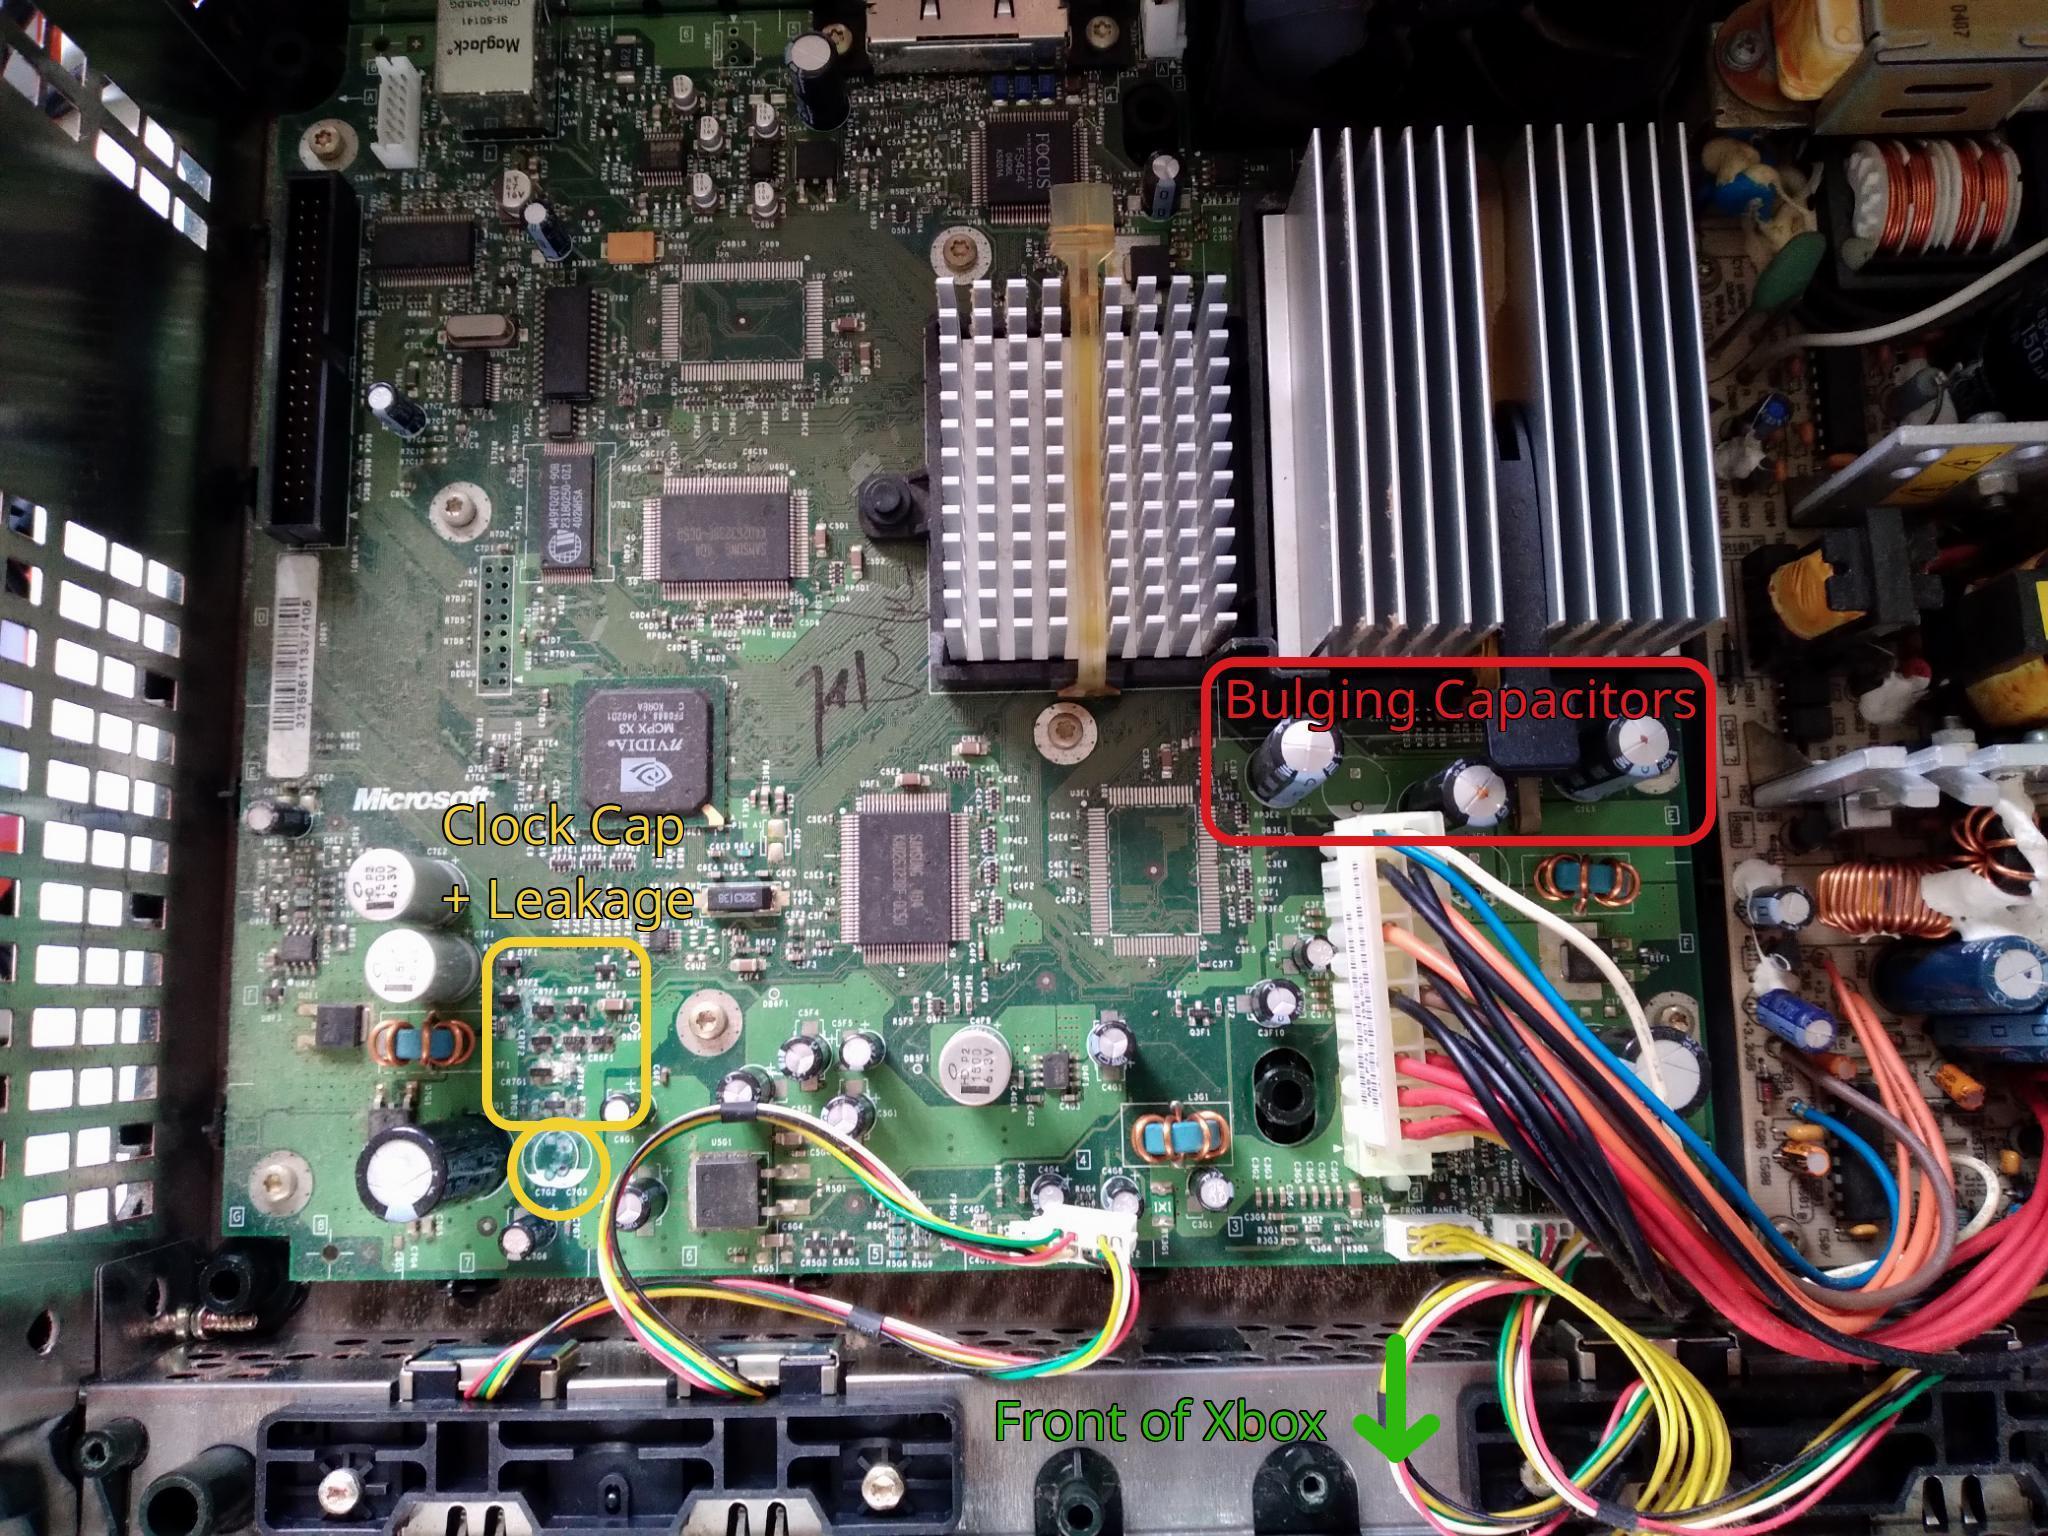
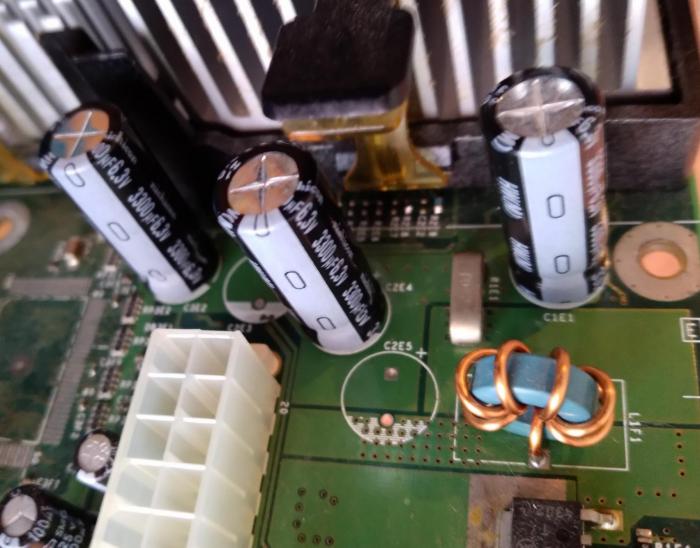
The Solution: I saw a bunch of comments and posts online that pointed out this was probably due to bad capacitors not regulating power/voltage to the processors properly. Many people referenced three capacitors in particular, located between the power supply and the CPU, as notoriously fail prone. I opened my xbox up again to see that those capacitors were bulging with some corrosion on the top, which means they were the likely issue and needed replacing.

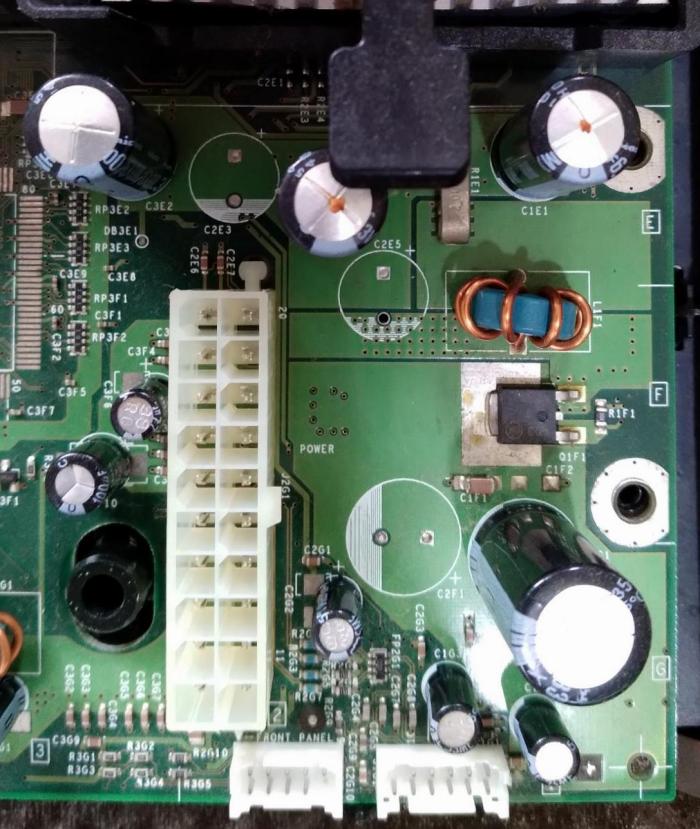
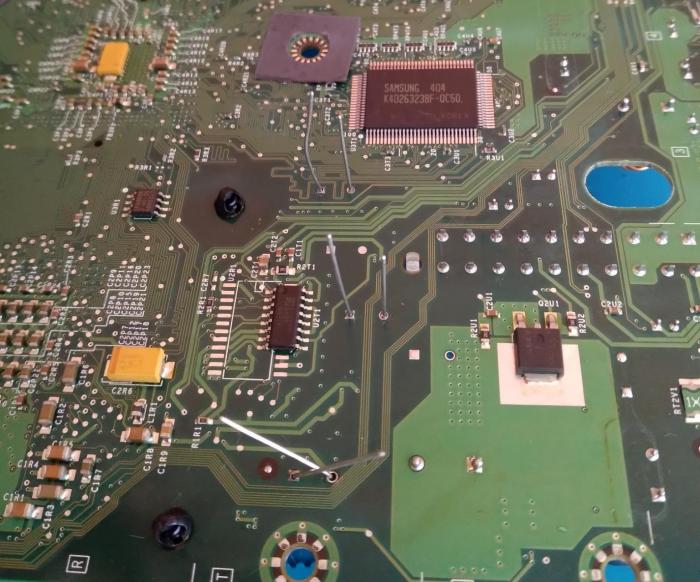
Inspecting the Board: I have a better understanding of what to look for regarding corrosion and problems on a circuit board (compared to when I 'fixed' the clock cap and drive belt), just from reading through the console wiki and watching repair videos. Apart from corrosion caused by the clock cap, and the bulging caps by the processors, the rest of the board looks fine (just dusty), no other capacitors bulging or corrosion.
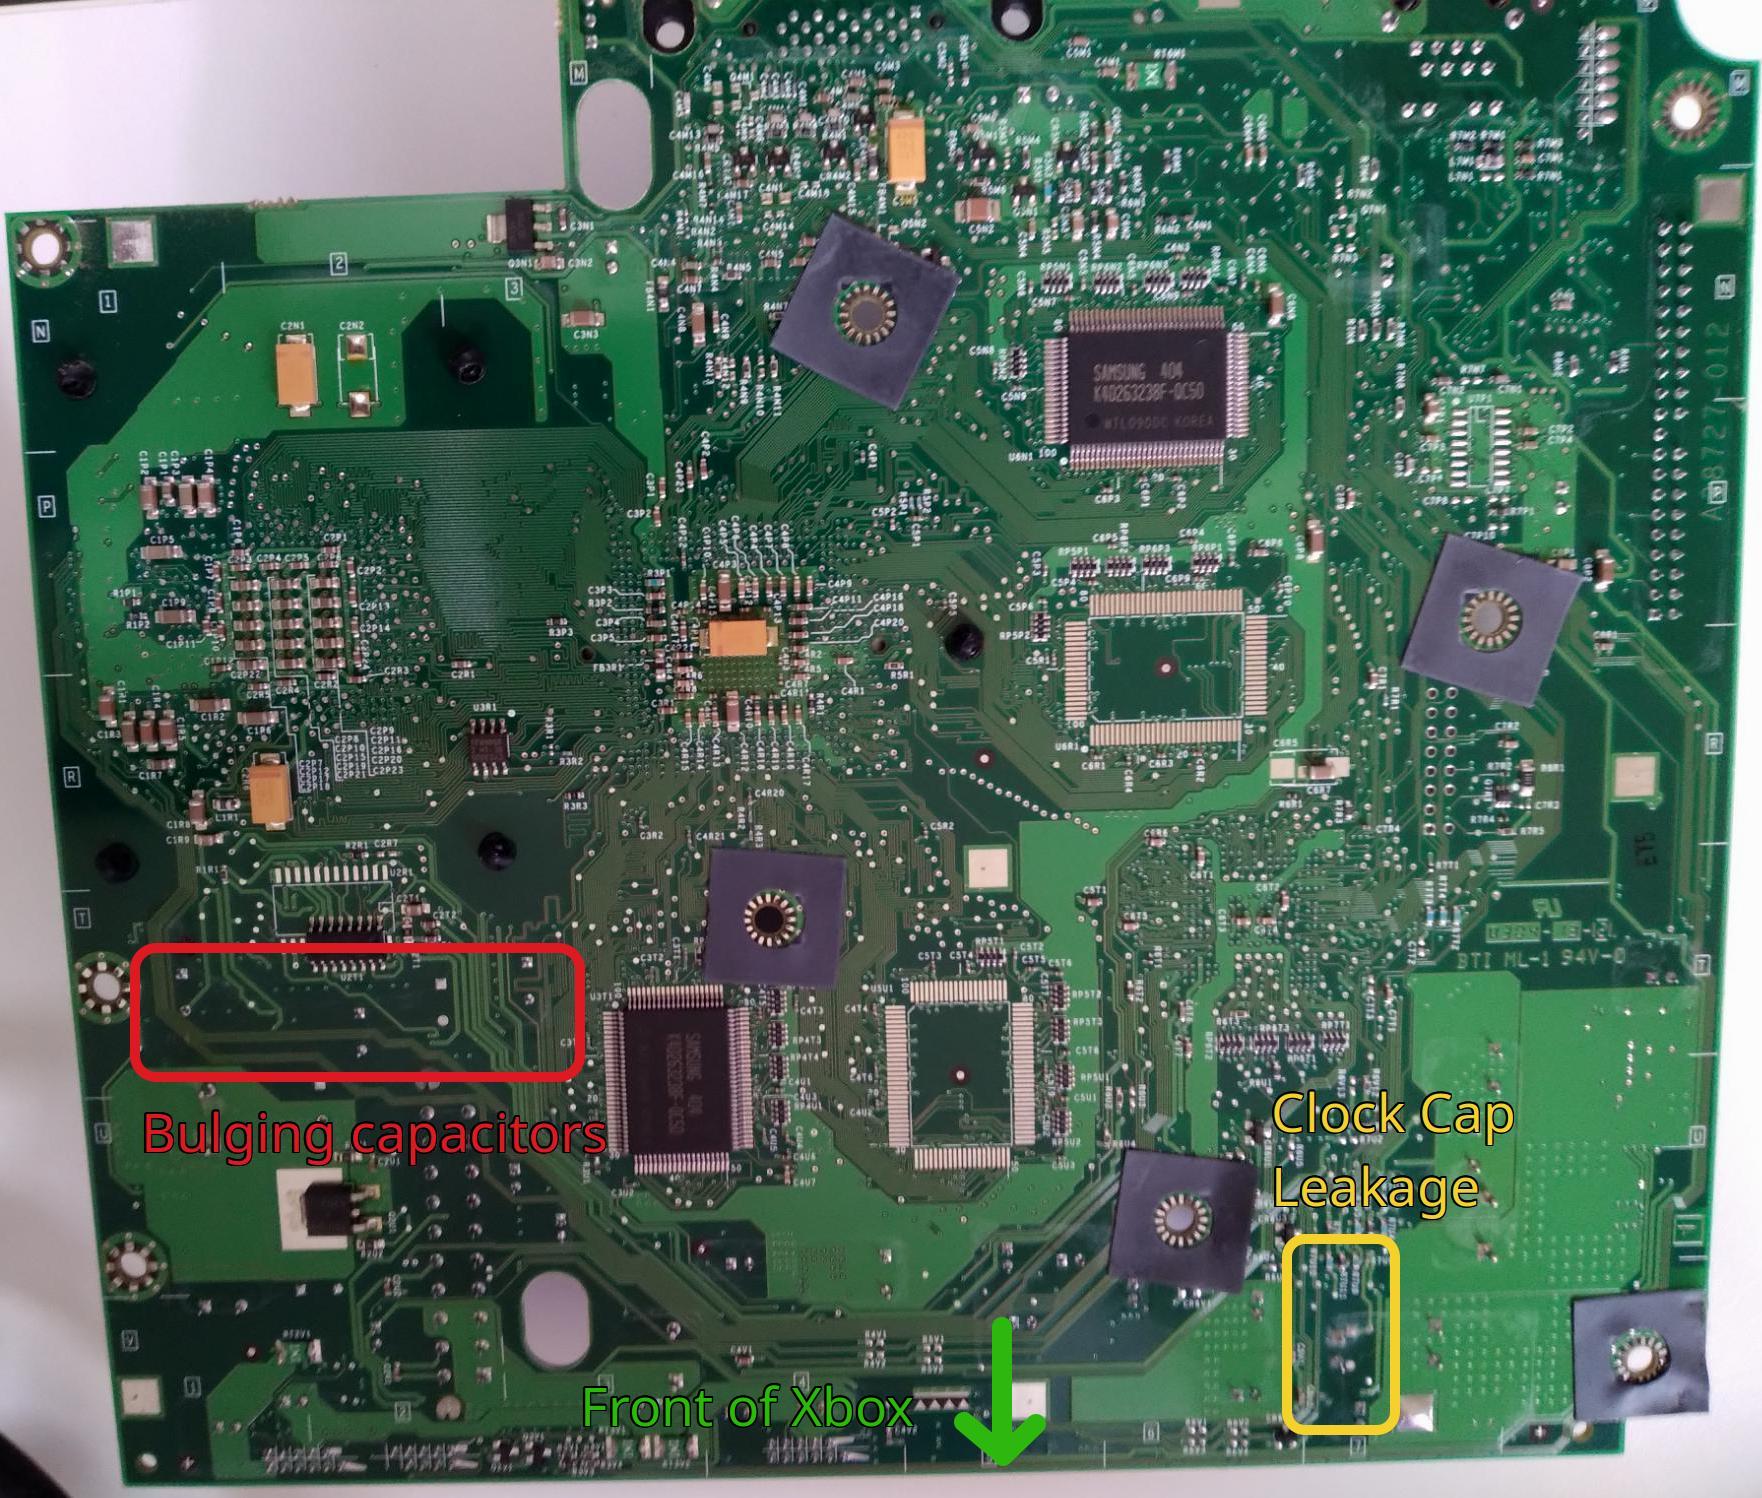
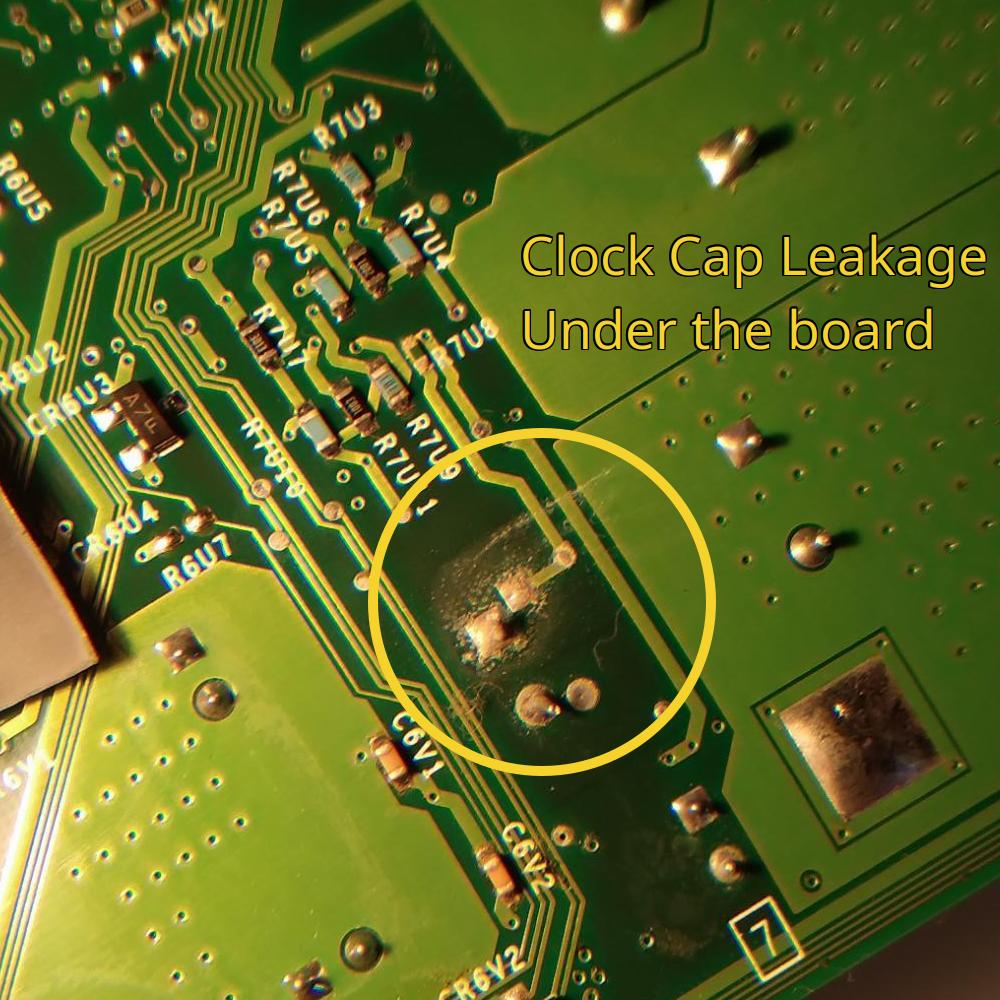
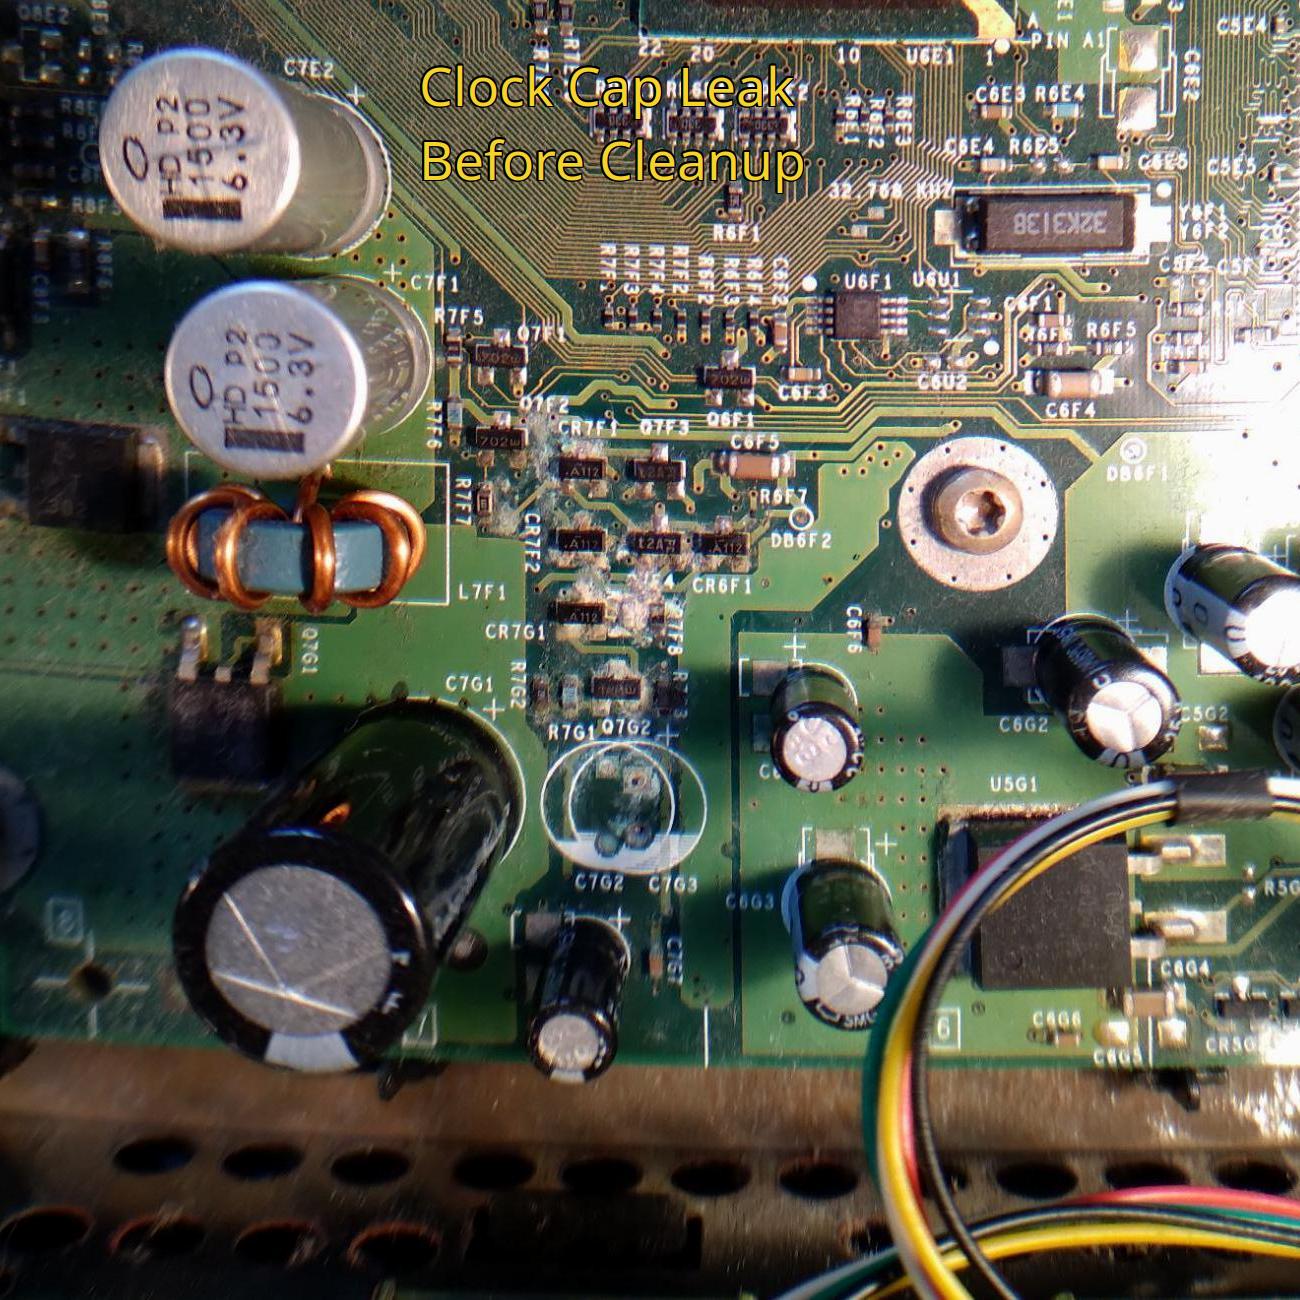
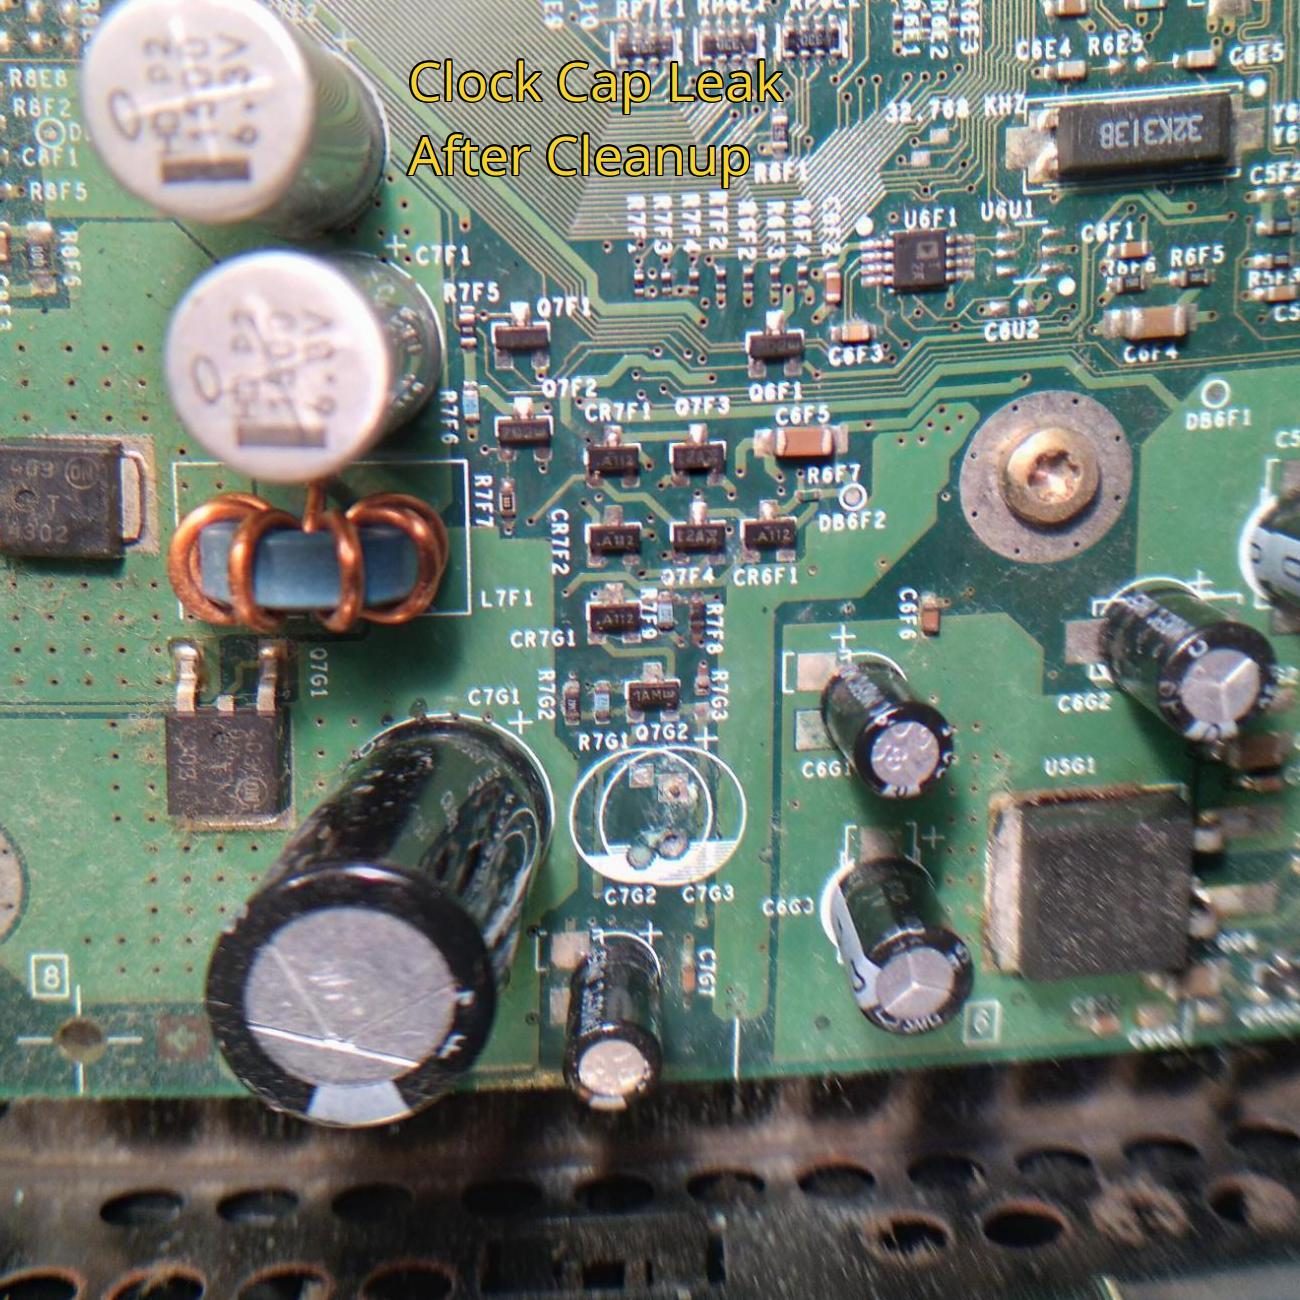
Clock Capacitor Leak: I cleaned the clock cap leak with vinegar/water to counter the alkaline corrosion, then isopropyl alcohol. Also used isopropyl for any further cleaning elsewhere on the board (there was some flux residue on bottom of the board, I assume from manufacturer).
pRecap: I have never soldered before, so I had put this off for a while. I was watching a random video from Sayaka's digital attic where she mentioned practising a complex soldering technique on old broken electronics. That made it click for me, like I wasn't going to learn how to fix this without trying, and while that's an obvious fact about any practical skill, it was enough to remove my procrastination mental block on this. Also this xbox was unplayably broken at the time, so I figured I may as well try the fix and if it goes wrong someone else could use the parts and I could play on an emulator.
Anyway, I didn't have any of the tools/supplies but luckily I mentioned this issue to my dad and he had a spare soldering iron (non temp controlled plug directly into wall kind) and some solder for me. I just had to get desoldering braid, flux, and a holder for the iron, all acquired from a local electronics chain for cheap. I then found approriate capacitors for the ones I was replacing, these are very inexpensive. The exact ones I used were Nichicon UHW0J332MPD (the link is for reference, these capacitors should be available from many other electrical wholesalers, maybe even a physical store local to you)
The Recap: This ended up being pretty straight forward, I did encounter and resolve one issue though. I did the standard stuff; apply flux, then heat from the soldering iron, while pushing the desoldering braid against the point to absorb the solder. The positive side of each cap (side without the grey strip of 0s) came loose immediately after that, but the negative side still needed heat to be applied while pulling the cap from below with pliers (slowly). On one of the caps, a leg snapped off with a very small piece left in and blocking the solder point. I tried a few things to get it free; more flux/desoldering braid, adding then removing solder, and pushing through one side with a metal paper clip heated by the iron. Eventually it got to a point where the iron could be pushed down onto the hole and the bit of leg was slowly moving out, I was then able to remove it with pliers. I guess the summary is; heat was the most effective and important thing here. You can be much more effective with a temp controlled solder station or a desoldering gun, but they are quite expensive and I only had three components to change.
I would have more photos, but I completely forgot to take any after it was done, and had already put the whole thing back together before realising (I was distracted/keen to test it). The soldering job was... a beginner's, not neat or super clean but I could see the solder was where it needed to be and the caps were secure. I think this fix ideally needed a finer tip on the iron and a smaller gauge solder than I used, but the result was still that the Xbox now works and the visual glitching is gone. I played through a level or two of Halo (a campaign I started last year that revealed the glitch to me) and everything is fine!
The (Retro-)Future: Obligatory 'It would be cool mod this xbox', but that's a whole other huge amount of research I'd have to do that I can't be bothered with right now. If I open it up again for a modchip or something, I will plan ahead and 'do everything' then (replace clock cap, grease the disc tray, replace the hard drive, and properly clean it up). I don't know if I'll bother imaging the harddrive, losing my old saves won't erase my memory of them. For now I just want to play some more of the games again, and I have a local second hand electronics chain that makes trading them in/out easy and afforable. I'm just happy that I managed to (erm...) do a thing that's new to me.
Thanks for reading!